How to Deploy a Node App to AWS EC2
7 minute read | Jan 12, 2020
engineering
This walkthrough will show you how to deploy a containerized Node.js app to Amazon Web Services and also assign a secure custom domain. We will be applying the following technologies and tools:
- Application: Node.js Express
- Container: Docker and Github
- Cloud Compute: AWS EC2 Ubuntu
- Domain: AWS ElasticIP, AWS Route53 and Namecheap Domains
- HTTPS: Nginx and Let's Encrypt
Click here for a link to the github repo
Summary Steps
- Create Node App with Dockerfile and deploy to Github
- Create EC2 Instance
- SSH into EC2 Instance
- Setup and Install EC2 Dependencies
- Create Route 53
- Purchase Namecheap Domain
- Setup Nginx and HTTPS
1. Create Node App with Dockerfile and deploy to Github
Create a simple Node Express app with the following folder structure
src
  L index.js
Dockerfile
package.json
Create a simple hello world web app.
// src/index.js
let express = require('express')
const PORT = process.env.PORT || 3000

let app = express()

app.get('/', (req, res) => {
  res.send('hi')
})

// Custom 404 route not found handler
app.use((req, res) => {
  res.status(404).send('404 not found')
})

app.listen(PORT, () => {
  console.log(`Listening on PORT ${PORT}`);
})
Create Dockerfile which will install specific version of node, install dependencies, expose relevant port and run start command.
# // Dockerfile

# Select node version and set working directory
FROM node:8-alpine
RUN mkdir -p /usr/src/app
WORKDIR /usr/src/app

# Install app dependencies
COPY package.json /usr/src/app
RUN npm install

# Bundle app source
COPY . /usr/src/app

# Expose publc port and run npm command
EXPOSE 3000
CMD ["npm", "start"]
Test locally by building the Docker image (check Docker desktop app is running).
docker build . -t <YOUR_APP_NAME>
Test locally by running the app. Expose port 3000 (we will later use Nginx reverse proxy to send HTTPS port 80 requests to localhost:3000)
docker run -p 3000:3000 <YOUR_APP_NAME>
Commit and deploy to a Github repo where we will later clone from our EC2 Instance.
git add .
git commit -m "initial commit"
git remote add origin "<YOUR_GITHUB_REPO_URL>"
git push origin master
2. Create EC2 Instance
Create a new AWS EC2 Instance and set a fixed public IP.
- Login to AWS Management Console
- Select EC2 and select Launch Instance
- Choose latest Ubuntu Server
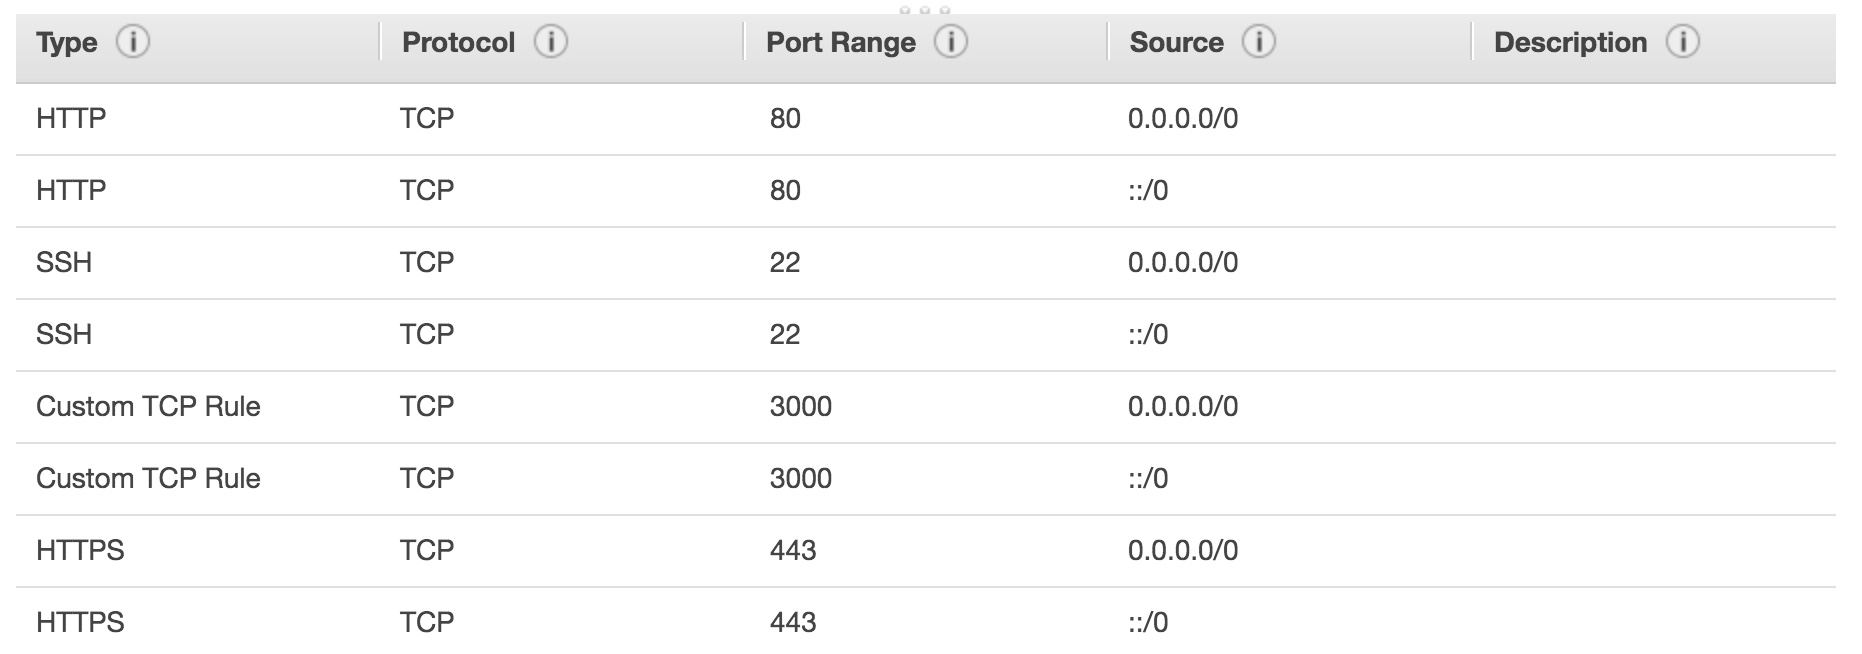
- Setup security groups including HTTP port 80 and HTTPS
- Create instance and create name of private key and download (you will need this to ssh login to your cloud instance)
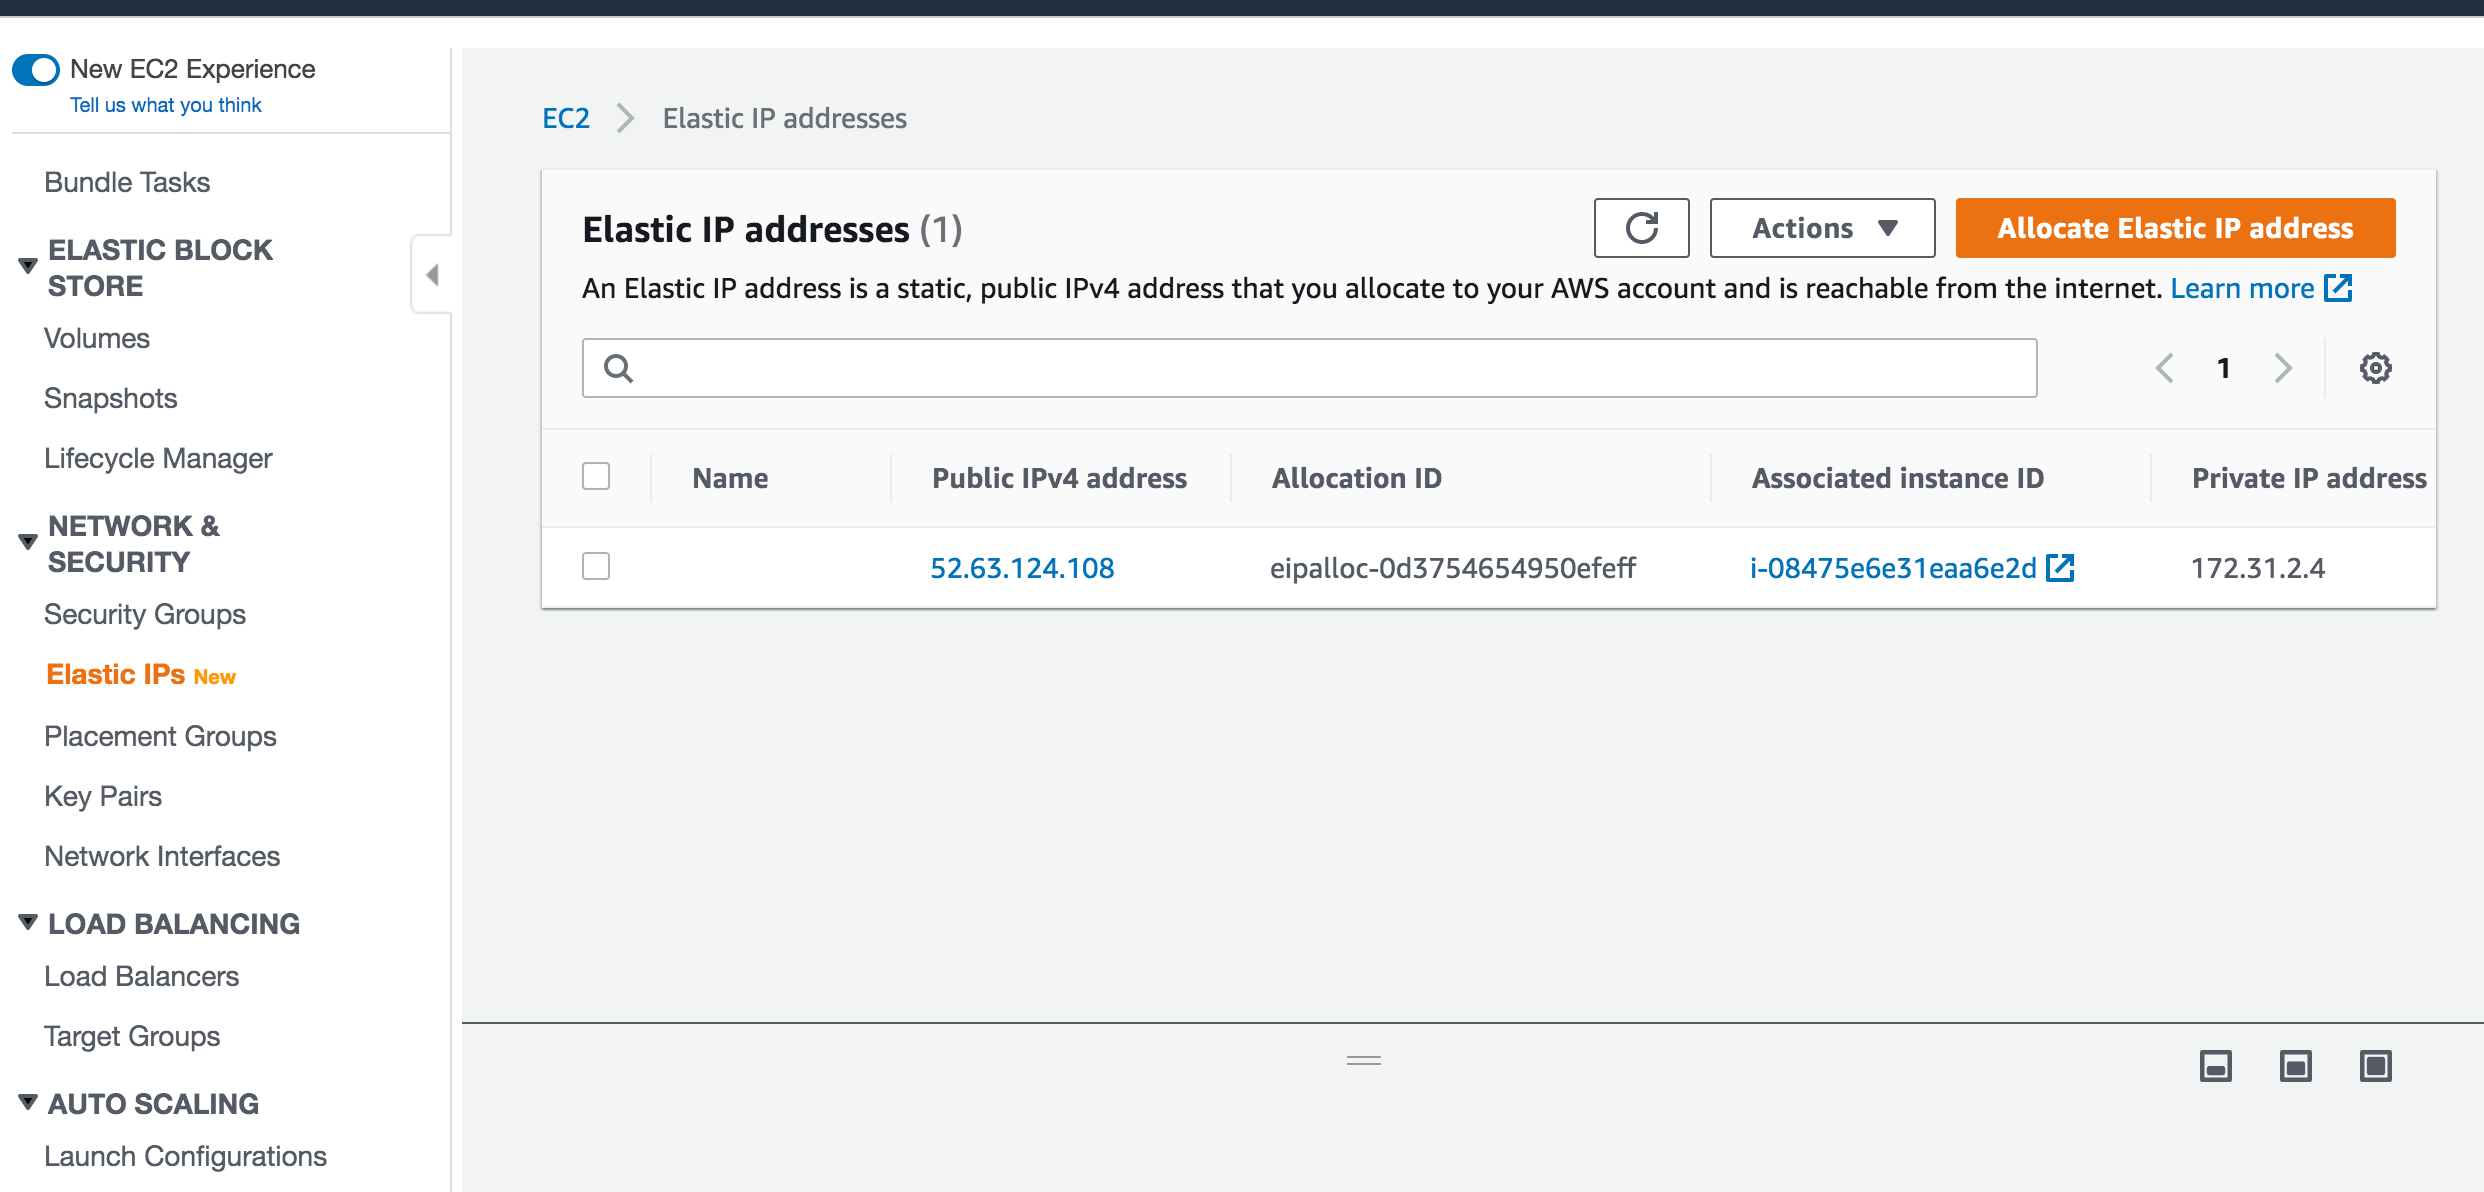
- Create Elastic IP and associate to your instance. This will keep a fixed public IP address for your instance


3. SSH into EC2 Instance
Login to our newly created EC2 Instance via SSH.
- Find and select your running EC2 instance and click Connect then follow the instructions
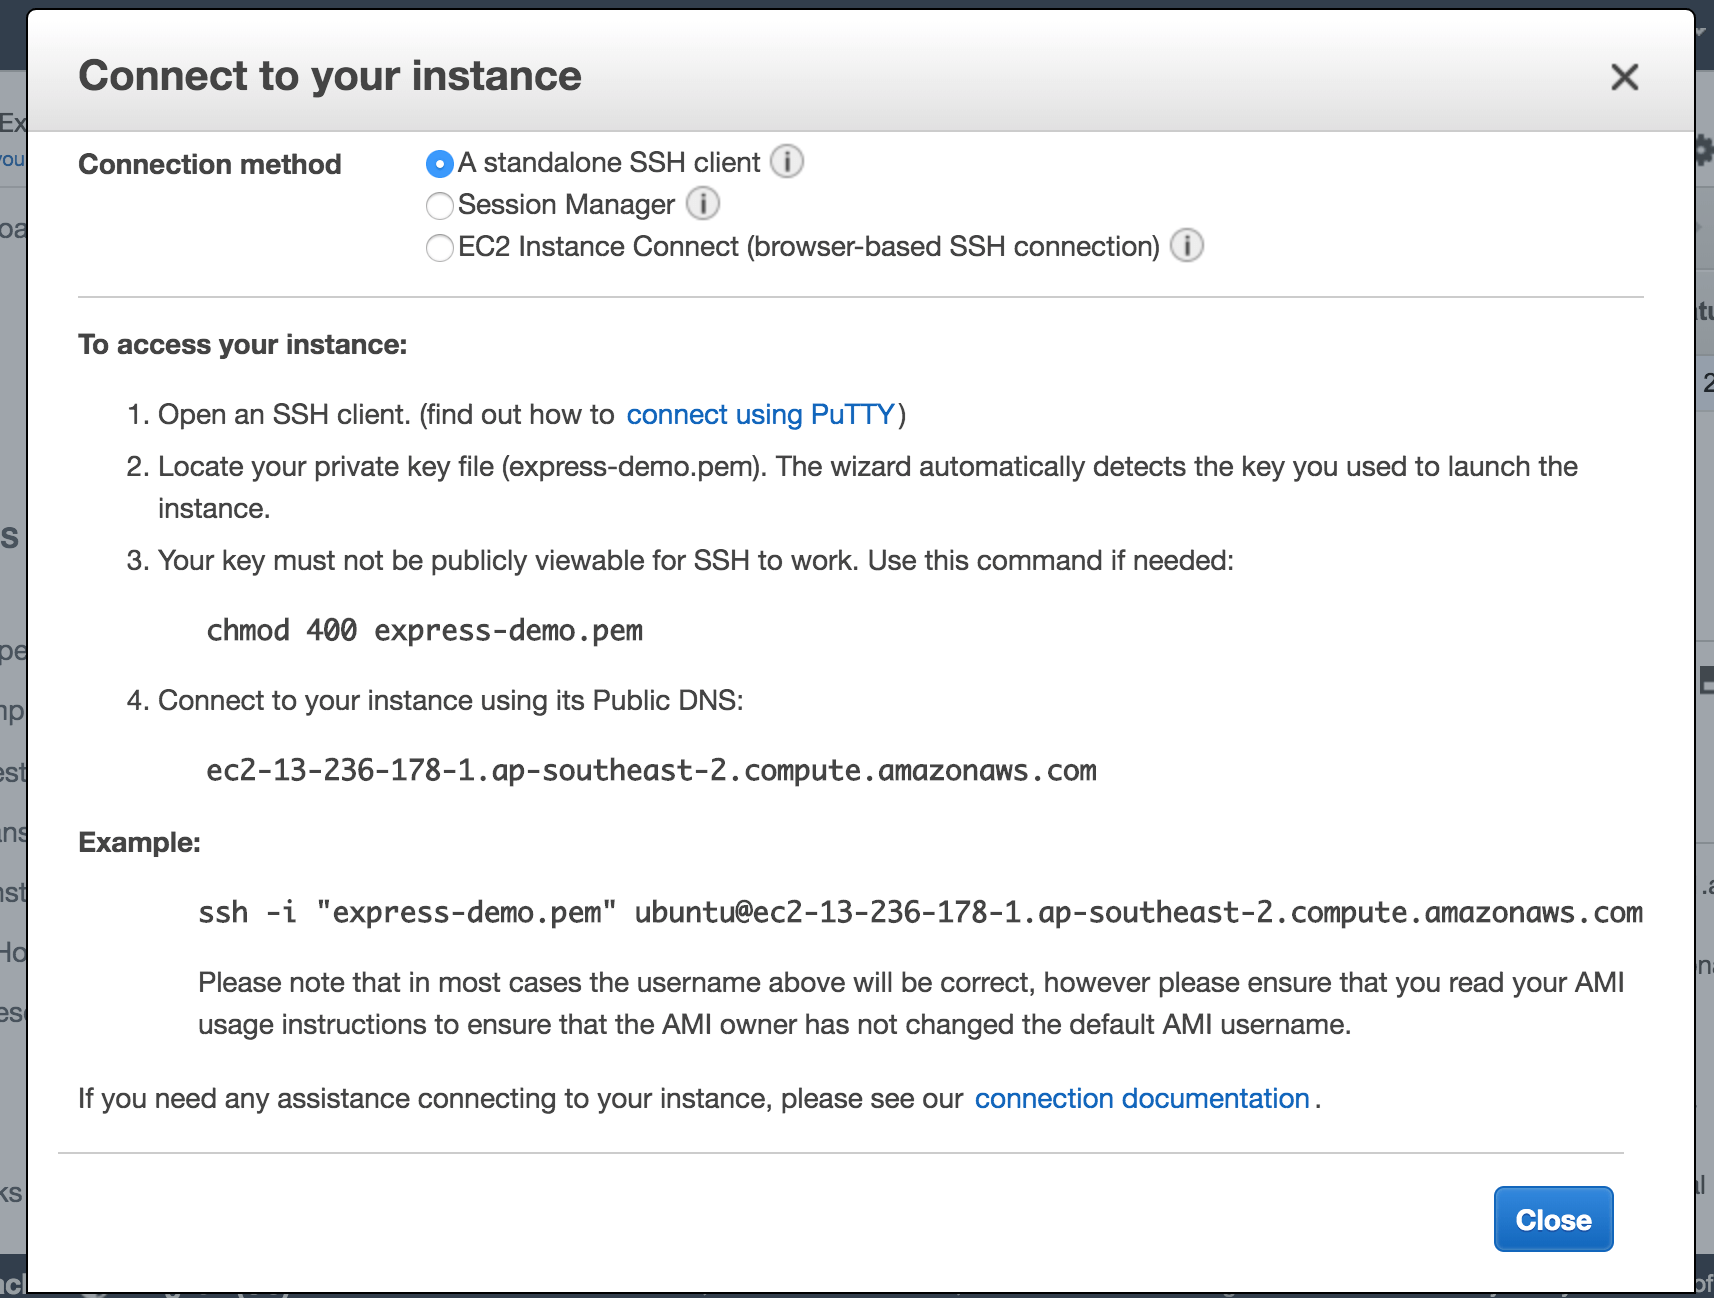
- Download your private key and run the following command to allow read ownership
chmod 400 <YOUR_PRIVATE_KEY_NAME>.pem - If you forget your private key you will not be able to easily SSH back in
- To asssist workflow create a folder named SSH in your local directory and include in .gitignore. You can keep your private key here and a textline of the SSH script. Then come back to this folder whenever you need to SSH in.

4. Setup and Install EC2 Dependencies
Clone github repo, install Docker, build image and run new image.
- SSH into instance (follow instructions by clicking on "Connect" in the instance). See AWS console to find exact ssh command, ensure you are in the root directory with your private key
ssh -i "<YOUR_PRIVATE_KEY_LOCATION_FILE.pem> <YOUR_USER>@<YOUR_AWS_PUBLIC_DNS>
- Once login successful, clone your github repo
git clone <YOUR_GITHUB_REPO_URL>
- Install Docker
curl -fsSL https://get.docker.com -o get-docker.sh
sh get-docker.sh
- Run Docker without sudo in ubuntu
cat /etc/passwd | grep ubuntu
sudo usermod -aG docker ubuntu
- Exit EC2 Instance and SSH back in and check you can run docker without sudo
docker ps
- Rebuild the Docker image (similar to what we did when testing locally)
docker build . -t <YOUR_APP_NAME>
- Run the Docker image in detatched mode
-dwhich will let it continue to run in the background. Set restart as always so it will run when the EC2 instance is restarted.
docker run --restart always -d -p 3000:3000 -t <YOUR_APP_NAME>
- If you exposed port 3000 in the EC2 instance you should now be able to see the application if you visit the public DNS
- To get the container id
docker ps
- To see container logs
docker logs <YOUR_CONTAINER_ID>
- To stop the container
docker stop <YOUR_CONTAINER_ID>
5. Create Route 53
Setup AWS Route53 for DNS forwarding from our custom domain to relevant EC2 Instances.
- Search for Route53 Service in AWS Management Console
- Get started and create a hosted zone
- Create the hosted zone and enter the domain name you wil purchase from namecheap
- Once clicked you will see the
NSrecords. Copy a record of these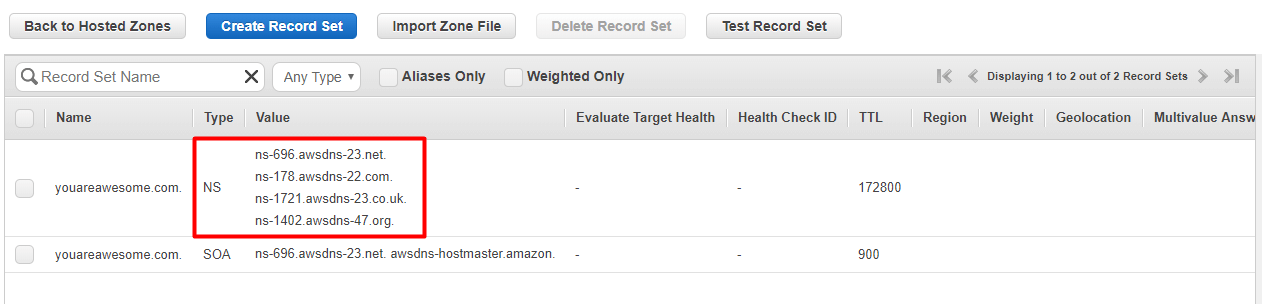

6. Purchase Namecheap Domain
Purchase custom domain and point to AWS Route 53.
- Purchase domain from namecheap and then set the Custom DNS to each of the
NSrecords from Route53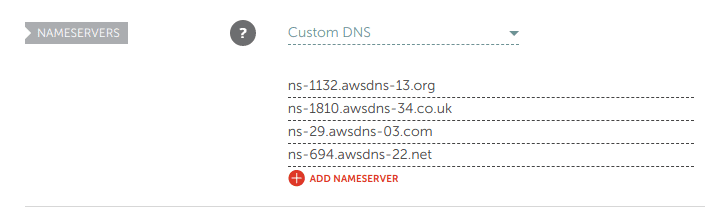
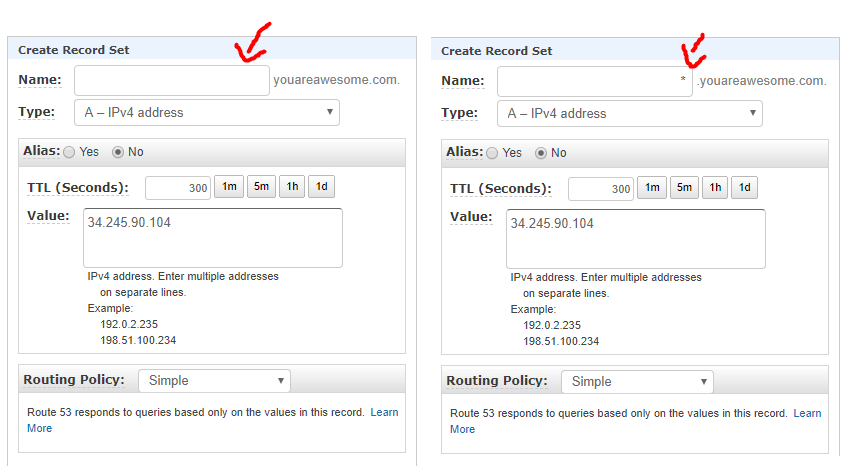
- Connect your Route 53 to Namecheap. Copy the public "IPv4 Public IP" of your EC2 Instance. Hit create record set button and create 2 records below. One set name as empty while latter prefi with *. Copy into value the IPv4 Public IP address into reach


7. Setup Nginx and HTTPS
Nginx reverse proxy port 80 to our Docker instance and setup secure HTTPS.
- SSH into EC2 Instance and setup nginx webserver
sudo apt-get install nginx
- Install certbot and build certificate
sudo apt-get install software-properties-common
sudo add-apt-repository ppa:certbot/certbot
sudo apt-get install python-certbot-nginx
- Make the certificate with the given domain names you have purchased. It may prompt for email
sudo certbot --nginx -d example.com -d www.example.com
- Remove default config file
sudo rm /etc/nginx/sites-enabled/default
- Create new file
cd /etc/nginx/sites-available/
sudo touch node
sudo vim /etc/nginx/sites-available/node
- Paste the following code in the file and replace example.com with your purchased domain and 3000 with your Node port
server {
  listen 80;
  listen [::]:80;
  server_name example.com www.example.com;
  return 301 https://$server_name$request_uri;
}

server {
  listen 443 ssl http2 default_server;
  listen [::]:443 ssl http2 default_server;
  server_name example.com www.example.com;

  location / {
    proxy_pass http://localhost:3000;
  }

  ssl_certificate /etc/letsencrypt/live/example.com/fullchain.pem;
  ssl_certificate_key /etc/letsencrypt/live/example.com/privkey.pem;
  ssl_protocols TLSv1 TLSv1.1 TLSv1.2;
  ssl_prefer_server_ciphers on;
  ssl_ciphers EECDH+CHACHA20:EECDH+AES128:RSA+AES128:EECDH+AES256:RSA+AES256:EECDH+3DES:RSA+3DES:!MD5;
  ssl_session_cache shared:SSL:5m;
  ssl_session_timeout 1h;
  add_header Strict-Transport-Security “max-age=15768000” always;
}
- Symlink config file to sites-enabled
sudo ln -s /etc/nginx/sites-available/node /etc/nginx/sites-enabled/node
- Restart nginx and apply
sudo service nginx restart
- If nginx error due to port 80 already in use. Find, kill and restart nginx
sudo fuser -k 80/tcp
sudo service nginx start
That's it.
You should now be able to visit your custom domain and be pointed to your Dockerized Node App on HTTPS.
Want more tips?
Get future posts with actionable tips in under 5 minutes and a bonus cheat sheet on '10 Biases Everyone Should Know'.
Your email stays private. No ads ever. Unsubscribe anytime.