Express Validation and Error Handling
10 minute read | Jun 21, 2019
engineering
How to validate requests and handle errors in Express.js using Joi validation library. Click here for a link to the repo.
- Gentle introduction to Joi validation
- General route error handling in Express.js
- Three examples of handling request validations
- Flash form validation errors
1. Gentle introduction to Joi validation
Joi is an expressive validator library for JavaScript objects. It helps ensure inputs are checked before progressing (e.g. to a DB).
You first create a schema and then validate the payload against the schema. If invalid it will throw the relevant error message.
let Joi = require('joi')

// Create schema
let createProductSchema = Joi.object().keys({
  description: Joi.string().required(),
  price: Joi.number().min(0.01).required()
})

let payload = {
  description: 'red book',
  price: 0.0001
}

Joi.validate(payload, createProductSchema)
  .then(validated => {
    console.log(validated);
  })
  .catch(err => {
    console.log(err);
    // [ { message: '"price" must be a number',
    // path: [ 'price' ],
    // type: 'number.base',
    // context: { value: null, key: 'price', label: 'price' } } ]
  })
We can DRY our code and refactor the schemas and validators into separate files
// validation/schemas/productSchema.js
let Joi = require('joi')

// We can reuse schemas
let priceSchema = Joi.number().min(0.01)

// Schema for creating a product, all fields are required
let createProductSchema = Joi.object().keys({
  description: Joi.string().required(),
  price: priceSchema.required()
})

// Schema for editing a product, all fields are optional and we can have a custom error message
let editProductSchema = Joi.object().keys({
  description: Joi.string(),
  price: priceSchema.error(() => 'when editing price must be number greater than 0.01')
})

module.exports = {
  createProductSchema,
  editProductSchema
}
//validation/createValidator.js
let Joi = require('joi')

// DRY our code with higher order function
const createValidator = (schema) =>
  (payload) => {
    return Joi.validate(payload, schema, {
      // shows all error messages instead of first error message
      abortEarly: false
    })
  }

module.exports = createValidator
2. General route error handling in Express.js
We need to create two error handlers in our express application to handle all server errors and 404 route errors.
This way if we throw an error in any of our other routes the error handler will catch and display the relevant error message.
let express = require('express')
let bodyParser = require('body-parser') // handle req.body
let app = express()
app.use(bodyParser.json())

// Require routes
app.use(require('./routes'))

// Custom server error handler
app.use((err, req, res, next) => {
  if (err) {
    console.error(err.message)
    if (!err.statusCode) {err.statusCode = 500} // Set 500 server code error if statuscode not set
    return res.status(err.statusCode).send({
      statusCode: err.statusCode,
      message: err.message
    })
  }

  next()
})

// Custom 404 route not found handler
app.use((req, res) => {
  res.status(404).send('404 not found')
})

const PORT = 3000
app.listen(PORT, () => {
  console.log(`Listening on PORT ${PORT}`);
})
3. Three examples of handling request validations
We can validate incoming Express payload requests using Joi in 3 ways:
- We handle the payload within the route and catch error if its invalid
- Create a custom middleware (see next section) to handle the validation and throw error if invalid
- Use the celebrate library which does same as option 2 but with more features
let express = require('express');
let router = express.Router();


// Validation
let createValidator = require('../validation/createValidator')
let { createProductSchema } = require('../validation/schemas/productSchema')
let validate = require('../validation/validateMiddleware')
let {celebrate} = require('celebrate')


// 1. Validation using Joi within route
let validateProductCreate = createValidator(createProductSchema)

router.post('/products', (req, res, next) => {
  validateProductCreate(req.body)
    .then(validatedProduct => {
      res.send({status: 'success', validatedProduct})
    })
    .catch(next)
})

// 2. Validation using Joi custom middleware
router.post('/products2', validate(createProductSchema), (req, res, next) => {
  let payload = req.body
  res.send({status: 'success', payload})
})

// 3. Validation using celebrate middleware library
router.post('/products3', celebrate({body: createProductSchema}), (req, res, next) => {
  let payload = req.body
  res.send({status: 'success', payload})
})

module.exports = router;
Generic Middleware
For option 2 we can create a generic middleware to handle validations.
// validation/validateMiddleware
let createValidator = require('./createValidator')

let validateMiddleware = (schema) =>
  (req, res, next) => {
    let payload = req.body
    let validate = createValidator(schema)

    // proceed next if validated otherwise catch error and pass onto express error handler
    validate(payload)
      .then(validated => {
        req.body = validated
        next()
      })
      .catch(next)
  }

module.exports = validateMiddleware
For option 3 we must also add the celebrate error handler in our server file above our custom error handlers. This gives us more verbose error handling messaging.
//server.js
let {errors} = require('celebrate') // handle celebrate joi errors

let app = express()

// Require routes
app.use(require('./routes'))

// Celebrate library error handler
app.use(errors())

// Custom server error handler
app.use((err, req, res, next) => {
})

// Custom 404 route not found handler
app.use((req, res) => {
})

const PORT = 3000
app.listen(PORT, () => {
})
4. Flash form validation errors
The methods above handle API validation errors. However, we may also want to display form validation errors in the browser as a flash message:
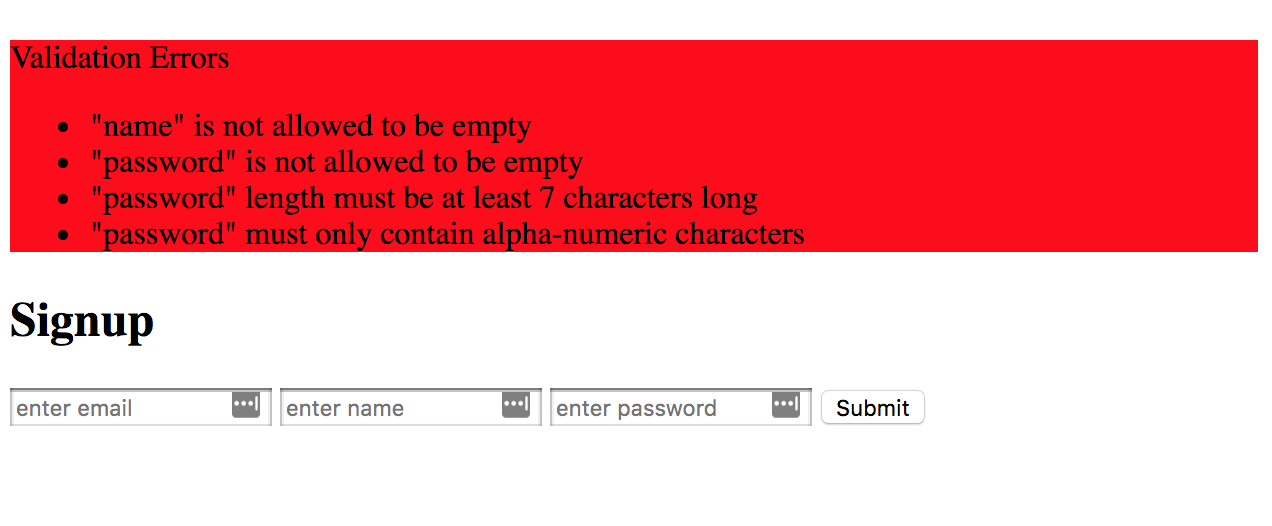
In this example we will have a signup form that requires three fields (email, name and password). It will validate and flash relevant validation errors.
We will achieve this in stages:
- Setup express to display flash messages
- Create user schema and HTML form
- Setup routes to handle validations
- DRY using middleware
1. Display flash messages
To display flash messages we need two libraries:
connect-flashfor flashing messages; andexpress-sessionfor storing sessions server-side in memory
We write a custom middleware to store the session message as a global variable in views in order to access it in any view template.
// server.js
let session = require('express-session')
let flash = require('connect-flash')

// session and flash views
app.use(session({
  secret: 'ilikecats',
  cookie: {},
  resave: false,
  saveUninitialized: true
}));
app.use(flash())

// store three flash variables as global variables in views
app.use((req, res, next) => {
  res.locals.messageSuccess = req.flash('messageSuccess')
  res.locals.messageFailure = req.flash('messageFailure')
  res.locals.validationFailure = req.flash('validationFailure')
  next();
})
Then in our views layout we insert placeholders to be able to render these flash messages if they exist. For the validationFailure it will be passed an array of messages so we want to loop through and display as a bullet points.
<!-- views/layouts/main.hbs -->

<div style="background-color: red">
  {{messageFailure}}
</div>

<div style="background-color: green">
  {{messageSuccess}}
</div>

<div style="background-color: red">
  {{#if validationFailure}}
  <p>Validation Errors</p>
  {{/if}}
  <ul>
    {{#each validationFailure}}
    <li>
      {{this}}
    </li>
    {{/each}}
  </ul>
</div>

{{{body}}}
2. User schema and form
As with our product schema above we will create a user schema to handle validation using Joi.
//validation/schemas/userSchema
let Joi = require('joi')

module.exports = Joi.object().keys({
  email: Joi.string().email(),
  name: Joi.string(),
  password: Joi.string().min(7).alphanum()
})
Now create a simple HTML form in our view template
<!-- views/signup.hbs -->
<form action="/signup" method="POST">
  <input type="email" placeholder="enter email" name="email">
  <input type="text" placeholder="enter name" name="name">
  <input type="password" placeholder="enter password" name="password">
  <input type="submit">
</form>
3. Setup signup routes
Use the validation helpers we used before along with the schema we created above. Create two routes: 1) for displaying the signup form and 2) for handling the form submission.
Validate the payload using Joi and if validation errors flash validation errors and redirect bac to form.
//routes
let express = require('express');
let router = express.Router();
let createValidator = require('../validation/createValidator')
let {createUserSchema} = require('../validation/schemas/userSchema')
let validateUser = createValidator(createUserSchema)

// display signup form
router.get('/signup', (req, res, next)) => {
  res.render('signup')
}

// handle submit signup form
router.post('/signup', (req, res, next)) => {
  let payload = req.body

  // Joi validation
  validateUser(payload)
    .then(data => {
      // If success; flash success message and redirect to form
      console.log(data)
      req.flash('messageSuccess', 'Success valid input')
      res.redirect('/signup')
    })
    .catch(err => {
      // If validation error flash array of messages and redirect
      let errorMessages = err.details.map(el => el.message)
      console.log(errorMessages)
      req.flash('validationFailure', errorMessages)
      res.redirect('/signup')
    })
}

module.exports = router
4. DRY with middleware
If we have many forms that require validating (e.g. for both edit and create) we can refactor our validation into a custom middleware.
Create a validateForm middleware function that takes a Joi schema as an argument and redirects back with validationFailure flash message if error.
//validation/middlewares/validateForm
let createValidator = require('../createValidator.js')

module.exports = (schema) =>
  (req, res, next) => {
    let payload = req.body
    let validate = createValidator(schema)

    validate(payload)
      .then(validated => {
        req.body = validated
        next()
      })
      .catch(err => {
        let errorMessages = err.details.map(el => el.message)
        console.log(errorMessages)
        req.flash('validationFailure', errorMessages)
        res.redirect('back')
      })
  }
We can now use it as reusable middleware for any route.
//routes/index.js
let validateForm = require('../validation/middlewares/validateForm')

// middleware handles redirect back with validationFailure flash message
// route then only has to deal with success outcome
router.post('/signup', validateForm(createUserSchema), (req, res, next) => {
  let payload = req.body
  // handle payload etc. in db
  console.log(payload);
  req.flash('messageSuccess', 'woohoo')
  res.redirect('/signup')
})
Want more tips?
Get future posts with actionable tips in under 5 minutes and a bonus cheat sheet on '10 Biases Everyone Should Know'.
Your email stays private. No ads ever. Unsubscribe anytime.
My other project
Investor Tool
World's largest tech companies